Thursday, 10 April 2014

Mr. Rusty visits Daiwa Certate

Mr. Rusty strikes back! This reel knob was apparently acting wobbly weird and the line roller wasn't even spinning. The victim in this case is a pimped up Daiwa Certate and it's time for a strip search!
Mr. Rusty left something unpleasant on this reel. We'll soon find out what and where.
First thing that was taken apart was the pimped up handle and knob. No rocket science, just a cap and a screw in the way of revealing the unpleasant gift from Mr. Rusty.
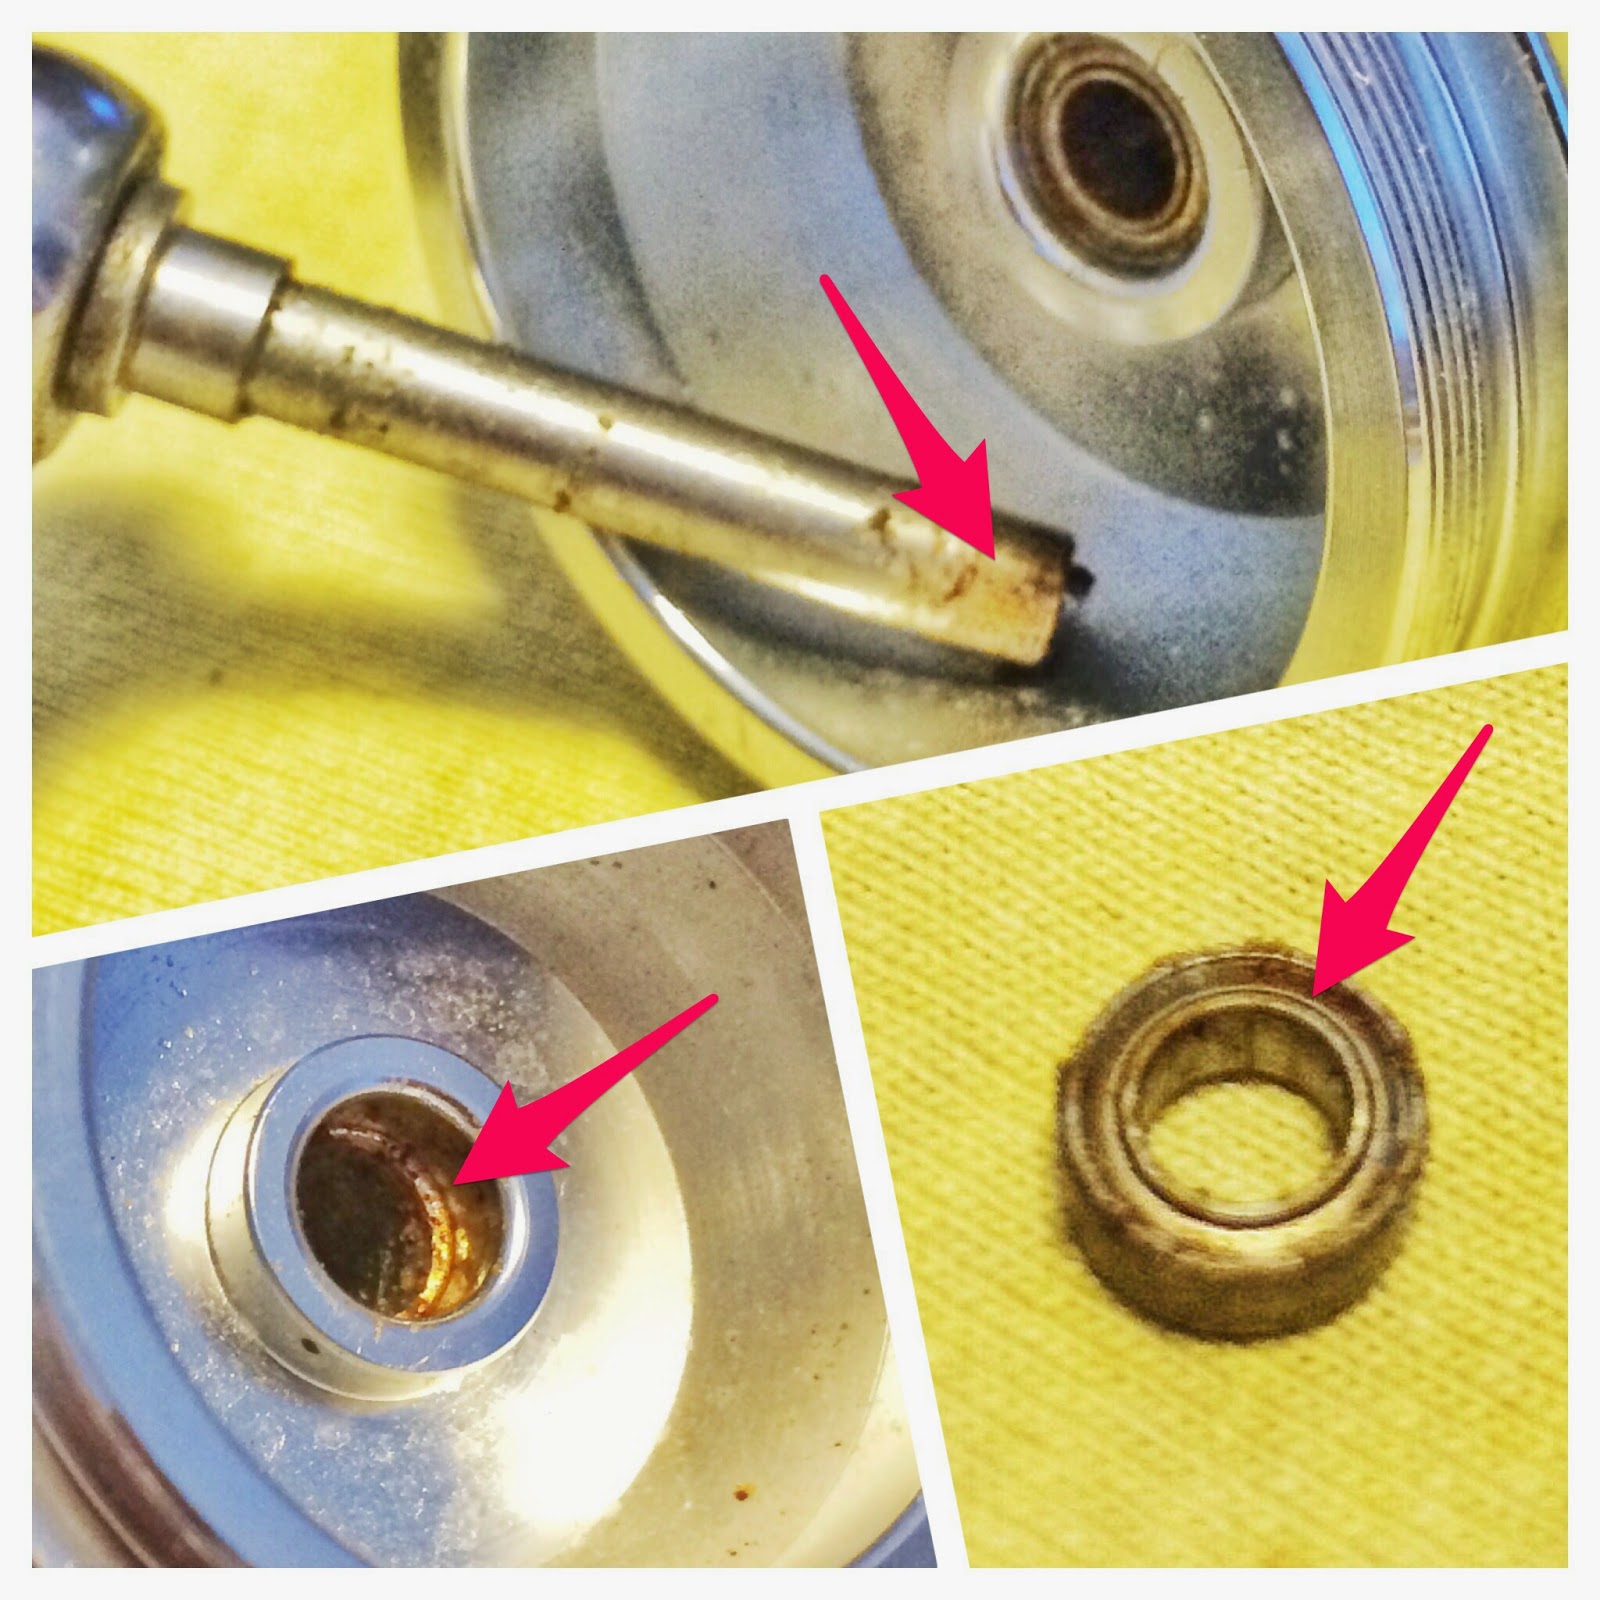
Knob slides off and behold! Mr. Rusty left an explosive dump here. Rust looked to have eaten up quite a bit out of the inner bearings most exposed to salt water, which is still stuck on the shaft as pictured. Bearing shield came off and that's a really bad case of rust and corrosion. The outer bearing seems perfectly fine.
The knob bearing closest to the handle seem to have exploded and grinded some of its own bits into the the potpourri of shield, balls, races to dust and rust.
It took quite a bit of time and rust remover to work deep into the corroded parts in order to dislodge the fused inner bearing race (blue arrow) on the shaft. Thoroughly chewed up shields (green) and busted balls (pink) only fell apart after rust remover seeped through the entire pile of rust over a period of time.

Mr. Rusty left some nasty scars of corroded pits on the shaft but isn't critical. All it needs now is a new bearing and proper coating of marine grease packed into the entire assembly.

New bearings being loaded with marine grease before fitment back into the handle shaft. Existing outer bearing cleaned and greased too.

Next up, line laying roller refused to spin. Screw removal was a little difficult too, I suspect it's overly enthusiastic thread locker used here as the screw is usually made of marine grade stainless steel that can withstand salt water corrosion without breaking any sweat. The shaft's aluminum, pretty much corrosion resistant.
Thread locker (red arrow) was found everywhere in the line roller shaft, including the inside of the bearing (white and red powdered stuff). Really bad stuff to be found in bearings. There seem to have a bit of rust but mostly jammed up thread locker's preventing the bearings to spin freely. It's causing quite a bit of challenge to remove the entire assembly as it's as good as fused together with so much thread locker everywhere. Luckily, after cleaning, the bearing seem to work fine only with slight roughness.

Cleaning of the line roller assembly was a little tricky as you need to physically remove the solidified material between tight creases like screw threads and worse of all, inside the bearings. This calls for steel bristle brushing and also good amounts of contact cleaner to remove any oily residue so that new marine grease could be packed into the entire assembly.

The remainder of the reel service was child's play after the above fiasco. Just a quick cleaning and new application of marine grease is all it needs. The only thing to be careful would be to avoid messing up the magseal.
Floating shaft & spool seat sleeve looked well used, still plenty of grease, no damages found. Cleaned, greased and good to go.

Avoid the magseal and you'll be left with just the gear box to deal with. You don't even need to mess with the one-way bearing. That's if it's spinning smooth and stopping without play.


Gearbox looks good, dry and like new. Just a quick clean up, wear and tear check, and add a fresh coat of marine grease. Nothing out of the ordinary and it's good to go.
The crack shaft bearing on the handle side seems a bit rough and a simple 2 step clean up with new grease packed in would do just fine. A 2 step clean up usually involves degreasing & contact cleaning after in order to replace lubrication in the bearing. Tougher grime or gunk would need the 3rd step involving an ultrasonic cleaning bath for a thorough cleaning.
No rust, but some light dust or gunk might have snugged in. Out goes the dirty grease and in goes new marine grease.

What have we learned today?

1. Go easy on the thread locker. What I usually do is use a small 'precision screw driver' to dip into the thread locker bottle/nozzle and then dab it over a few spots on screws. I don't even coat the entire screw. If too much was accidentally applied, just clean it off with paper towel before it dries. It doesn't even need to be reapplied upon next removal or the next, it stays there long enough to hold the screw from coming off. I only see a need for reapplication when there is absolutely no friction when removing the screw.
Steel brushed existing screw to strip off old thread locker gunk (white arrow). Light dabs of new thread locker and rub it around just a little towards the tip (red arrow).


2. Mr. Rusty can cause explosive damages to bearings if left unattended for too long. Early detection is key to stopping Mr. Rusty leaving unwanted gifts for your reel. Or you'll have an excuse to pimp it up with exotic parts.

Thursday, 3 April 2014

How do you get a Biomaster to lay nice?


After a recent off shore trip to Pekan hauling some decently sized diamond trevallys, a friend noticed that his Shimano Biomaster was starting to make noise under load. A quick visual and external inspection revealed that the line laying guide wasn't spinning. No surprises there as this is first part to usually fail when offshore fishing often with lots of salt water exposure.

This Biomaster isn't the salt water variant and to my knowledge recent Shimano's don't come in salt water variant below 4000 sized reels.
Externally, this reel's already pimped up with an after market knob. The knob also felt like there was slight binding when spinning.

After market knob with an open outer cap allows water to easily splash into the bearings. When removed, the culprit was easy to spot with gunk and rust everywhere on the shaft as well as the bearing housing. Luckily, they are mostly light surface damages. Bearings stuck as I suspect rust has caught up inside.
Surface rust and gunk on this was easy to remove but the bearing was a bit more damaged. The bearing was free again after ultra sonic cleaning was done. Possibly only minor damages and seem to be quite smooth after being packed with marine grease. Not a major deal breaker nor will it generate noise therefore a replacement isn't necessary.

Once cleaned and rebuilt, bearing was working fine, light scuff found on shaft and bearing housing. A good dose of grease pumped in to the bearing, a wad to cover the screw and seams around the bearing for better protection as water can easily flow into this area.
The line roller set doesn't look so good upon disassembly. There was some force binding damages on the bail end cap and the bearing wasn't spinning as a result of rusty balls.
Forced binding damage found on the bail end cap (top left red arrow). Rust and gunk seeped into the like guide ring (green). Light rust was found inside the bearing where it's jammed up (bottom red arrows).
With a jammed up bearing, the only way to rebuild this is to clean it ultrasonically and see if it's ok for a rebuild. The rebuild was ok after the ultrasonic bath but not 100%. This means that the bearing is good to go fishing but grinding sound may not be entirely eliminated. A quick check with the owner says that he doesn't mind trying it out first to see if he can live with it.

This reel doesn't come with seals around the line roller and therefore packing the entire assembly with marine grease would greatly help in preventing water from entering. When you have no gaps or space inside the assembly, water will have no space to fill or trapped in
I prefer to replace any space/air in the line laying assembly so that water doesn't have any space to fill. This will serve as a very good seal against water intrusion at the same time lubricating the bearings for long periods of time. On top of that, line roller bearing's function is to take heavy torque load as priority, not speed, the likes of spool support bearings for bait-casters.
Fully loaded, marine grease oozing out (left) as the line guide is being assembled back into position. Replace space/air (right) with more grease to form a seal. Any excess can be brushed off afterwards.
Upon opening up the gearbox for a regular check-up and service, the sight was a bit shocking with corroded pits seen all over the main gear. Some of the gearing tooth were also affected with slight pitting.

Box was clean but needs a nice protective layer. Corroded pits can be seen everywhere (red arrows).
Some of the pits were on the gear tooth and some of the tooth were also showing signs of good use and worn off bits.

Some deep pits, cannot be removed (red). Well worn gears most likely from heavy cranking while fighting fish (blue).
There isn't much to be done with pitting but to give it a nice steel brush down to remove damaged bits off the surface and give it a new coat of protective marine grease.

Pits are still visible but a good layer of marine grease should keep it going for a long time to come. Nicely greased up box too.
This reel has put up some serious fight against quite a bit of fish as you can see from the collected gunk of fiber and grease on the drag stack.

Move along, nothing to see here with standard drags and nicely used gunk. Don't need messing about if it ain't faulty.

All in all, this reel has seen some serious action but needs a bit more TLC than its current condition. When I first picked up the reel, there were salt crystals everywhere on the reel. A note to the owner would be to at least give it a nice fresh water rinse down after off shore action and the reel will serve him long time.

Wednesday, 26 March 2014

Mr. Rusty visits Daiwa Ryoga

A friend's been complaining about his Daiwa Ryoga's making rough grinding noise while cranking. The usual suspect's not hard to pin down as it is usually one of the outer most bearings where water can easily sneak in, was likely a visit from Mr. Rusty. This reel's seen some serious action and most recently, it's been used for salt water fishing too.

A popular model, somehow a people's choice for salt water fishing too.
This reel isn't really water proof but most materials used are corrosion resistant. There are no seals or gaskets around the box to prevent water intrusion and the design seems to allow water to pass through without getting trapped. However, the drag stack is supposed to be water-proof with o-ring seals around it.
Water everywhere in the gearbox. Possibly from rinsing after fishing. That means water can easily sneak all the way in to the gear box since there are no rubber seals or gaskets. Top stack of the drag is o-ring sealed both around outer ring and on the crank shaft.

If water gets trapped in the gearbox, it's definitely a bad sign and there seems to have some gunk oozing out from the anti-reverse bearing.
MR. Rusty found. There was quite a bit of gunk oozing out of the anti-reverse bearing and upon sliding the sleeve out, blotches of rust was everywhere on the sleeve, bearing pins and housing.
Luckily, rusty grime somehow hasn't dug deep into metal surfaces as it is probably an early detection. Rust removal was straight forward and surface cleaning afterwards made for a spanking clean bearing pins and roller sleeve. The outer most crank shaft support bearing looks like a corrosion resistant bearing that 'should' shield water away from the anti-reverse bearing but the inside's exposed.
A dab of one-way bearing oil, roll and work it into the roller pins for good measure. Just make sure that the excess oil's cleaned up using absorbent kitchen towel without it dripping or flowing everywhere into the reel. Marine grease all over the outer most bearing that doesn't seem to have any exposure to water and rolls smooth as new.
When the stacked gear with drag discs was removed, it looked like a mud fight took place. A combination of grease, carbon dust and water inside the drag system. Weird thing is that this drag stack is suppose to be water proof with o-ring seals around the top stack disc and also on the crank shaft.

Mud like gunk all over the entire drag stack system. Degreased and cleaned then marine grease brushed all over for protection and water displacement.
Most of the grease that came with the reel when new were no where to be seen. Too dry for my liking and definitely needs to be brushed cleaned before applying a new layer of marine grease.

Too dry and needs thorough cleaning to remove old grease/gunk before applying a new layer of marine grease.


Here's a mid way reassembly and grease application on most surfaces not just to protect but also to displace any water in the event of water intrusion. Make sure to work the mechanical parts in order for the grease to work into all contact areas.
Upon general cleaning of all mechanical parts, new marine grease is being applied all throughout. Green arrow shows where o-ring's suppose to prevent water intrusion, removed and cleaned in case there are debris stuck preventing the o-ring from doing its intended job.
Top most layer of the drag stack with o-rings around the outside somehow wasn't stopping water intrusion. O-rings removed and cleaned, marine grease thorouhgly brushed all over the gaps between the disc and gear as well as the crank shaft.

What was not shown here are the spool support bearings that seems to be smooth as silk and spins freely as they are quite shielded from water exposure. Even though plenty of people claim to use this reel for salt water application, I wouldn't bet my money on using it right out off the box. I'd definitely give it a full strip down with sufficient marine grease coat on it before doing so to ensure prolonged lifespan and longer lasting fishing adventures.

Thursday, 13 March 2014

Slow pitch & long fall jigging at Pulau Jarak.


To usher in 2014, we kicked it off to a jiggy good start at Pulau Jarak. A 3 days 2 nights easy going trip with a bunch of like minded enthusiastic anglers. It's been a while since the last time I set foot on the all too familiar GT Chaser with its leathery clean and hardy deck. We kept reminding ourselves that every trip to Pulau Jarak will never be the same and all we can do is to be prepared for almost anything and everything.

This time around, we managed to have some good fun with a variety of feeding frenzies and the occasional awkward deafening silence of no hook ups for hours.

We did however manage to document some interesting catches. Here's what we call slow pitch and also long fall jigging. A technique used in combination of the target species, jigs used, and most importantly to pace ourselves between the intense high pitch jigging.


On the first day jigging at depths of around 60-80meters, to our surprise the only fish that was fond of our sexy jigs were the GTs even around the seabed. GTs after GTs. The fun wore out rather quickly as it wasn't fun trying to haul GTs up from great depths. No other species were around or taking out jigs, we'll just have to put on a brave face, keep calm and keep cranking.

Majorcraft Giant Killing's jig rod fully loaded. This rod is a force to be reckoned with.

Xesta jig deemed too sexy for this GT, worked at moderate speed.
Another on falls for the Xesta, also worked at moderate speeds taken on the fall about 5 meters off the seabed.

Double hook up on Shout jigs. Stay and Width jigs. Worked slow taken on the fall.
The Gees kept hitting, this one went for the new Xesta Agraam, worked fast and was stopped like hitting a freight train.

Up close of the Xesta Agraam speed jig.

On day 2, we went popping around Pulau Jarak shallows and yielded just 1 take. Weird GTs here taking jigs and not poppers or stick baits. For hours we went around and about, no more hook ups. We then headed a little bit further out to deeper waters in search of demersals. Again, nothing was taking our jigs.

Without further delays, we headed to deeper jigging grounds. First stop, a notorious spot called 'Hutan Melintang' as we couldn't believe that not a single fish was interested in our jigs. An infamous spot known for its wide variety of predators namely razor sharp toothed gangsters like sharks, barracudas & spanish macks that just can't help confiscating our jigs and hooks.

As usual, another surprise for a few of us, a mate got the first take and felt like it was a snag. He kept cranking and didn't budge. Another mate got another take, this time it took some drag and immediately after, I was on too! The first fish finally realised it's been hooked up and started to dart about taking drag. And all of a sudden, all 3 of us couldn't feel anything anymore and started retrieving our lines. It felt like it was all tangled up and an occasional tug here and there. We then noticed that there was a school of cobia gangsters, jigs in mouth, swimming up towards us and the boat. The school took notice and immediately scrambled, made a sharp turn parallel to the boat tangling up a few more lines as they go. 2 of us lost our fish and only the first one survived and managed to land the whopper of a cobia of about 30kgs!

On the next drop with a new jig tied on, a quick take and feisty fight ensues.
This small cobia took fancy to my Xesta Agraam jig and was no match for the Majorcraft Giant Killing rod.
After the cobia frenzy drought hit us hard for the next few hours hauling only one grouper and another tiny spanish mack. Before the sun sets, we headed off to anchor at Pulau Sembilan (P9) slowly winding down the day before night falls. A nicely semi sheltered spot famous for its big schools of giant hard tail scads. We quickly switched to our favourite ultra light jigging gear Evergreen Temujin Spider matched with a Shimano Stella 1000FE. We managed to fill up all of our ice boxes and witness the occasional spectacular queen fish aerial fights.

Full loaded Temujin Spider. This is no giant hard tail scad fight.
Feisty little queen fish put up a massive fight taking my IMA Gun 12g for a good run.
And another bigger queenie guaranteeing a good run on the ultra light tackle.

All in all, another signature appeal of Pulau Jarak's unpredictability and yet hauling quite a bit of fish (mostly hard tail scads). We'll be back to keep Pulau Jarak's reputation in check till the next time.

Photos courtesy of Tackle Source.

Wednesday, 5 March 2014

Conquest of Gold Member

How do you pimp a reel that's already as groovy looking as a Gold Member? Inject some contrast and remove some gold to give prominence to it's flashy golden bits!

Gold Member in question here is the Shimano Calcutta Conquest. A new reel out of the box and yet old news as they've recently just announced an updated Calcutta Conquest for 2014 which will be available by the end of the first quarter.

Again, the pimped bits were all year end sales opportunities just like the Daiwa Tatula pimp up process. Bits of carbon fiber complimented by black and gold trim, black anodized parts and most importantly, hybrid ceramic bearings for some extra spinning momentum and distance.

Vanity shot of all the pimpy bits ready to be loaded into this Gold Member. A nice mash-up different brands and parts.

I'm starting to appreciate more and more of Shimano's reel designs that allows you to easily swap out parts as replacement or upgrades. To swap out the free spool support bearings, all you need is a just a tweezer. You don't even need to whip out any screw driver. Kudos to Shimano!

Bearings replaced without lifting a screw driver. Most tweezers would be able to pick out the pentagon shaped spring wire retainer. Top: bearing tucks inside SVS brake access spool cage. Bottom: unscrewing the mechanical brake knob reveals the other spool support bearing.
As usual, I would give any new reel a nice coating of marine grease all over internally to give it that extra layer of protection to dispel water. I find it rather critical for my application of not just fresh water but also salt water exposure to my reels. This Shimano Calcutta Conquest comes with pretty beefy multi-disc drag system and yet very smooth. It's a tad dry on stock and additional drag grease can be added for the extra smoothness. The drag system design looks like it can easily take larger dimension discs without any problems and I suspect the Ocea Jigger discs are also compatible. Time will tell and I will give it a try when it's time to swap them out to smooth drags.
Gold member's gearbox exposed, nicely lathered with salt water grease for protection. Wet drag washers a tad too dry for my liking. A few trips in and I'll swap them out with smooth drags in custom sizes for stronger stopping power.

The handle swap is more of a cosmetic job and a little bit of a weight reduction using carbon fiber handle. I opted for the swept handle with black anodized star drag and foam knobs with gold accents to match the grooviness of the gold theme.
Black and Gold. Knobs and handle's a custom chop job from 2 different brands. Not in favour of the red bits but not a deal breaker too until I find something suitable. This is a 98mm length handle and recently there's a longer version of 108mm which will work better with stronger cranking power.

Tramp stamp on the outside of what to expect inside.
A nicely designed & built reel, once again yet to wet the lines with mouth watering looks. All I need now is a decent trip to put this Gold Member to the test to see if the bling pimpness would be able to help lure in some victims.