Wednesday 30 April 2014

Hunting diamonds with GUNpekies ablaze!

After the new year, we've been anxiously waiting for news of good weather from the east coast opening up for some light tackle action. Not only were we told that the season opened, there were rumours of some groups hitting the mother lode of landing over 30 diamond trevallies in a day, some say 40s too.

A few days later, we're by the river jetty gazing over boats bobbing about, eagerly awaiting our boatman's arrival. Tackles ablaze, with a few acknowledging nods with the boatman, we load the boat up and head straight out with hopes held quietly high.

An hour or so later, we were dropping jigs at our first spot and struck the mother lode.

A nice size diamond on Evergreen's Caprice Kid jig taken on the fluttering drop, took quite a bit of crank in before being confirmed a solid hook up.

Firm steady hook up around the kisser.
Within the first 2 hours, fish finder were marking schools under and around the boat with multiple hook ups. Feeding frenzy ensues with various sizes being hooked up.

Nice sized diamonds on a double hook up next to each other. Even if there were misses, dropping the jig in again immediately invited other takers!

Double trouble all thanks to IMA's notoriously effective Gunpeki!
Occasionally, the school disappears and prompted us to search about nearby as the boatman suggests that they seldom wander far. Sometimes we find them, but sometimes we find other gangsters of the seabed.

1 Gun 2 fish. Greedy groupers with mouths barely big enough for the jig!
Multiple hook ups all throughout when we hit the sweet spot!
The frenzied excitement stirred up quite a bit of itch out of the deckie and asked me to loan him my idling light tackle as well as some Gunpekies to try out. He was casting off lighter jigs away from where we were jigging covering more grounds and busting up diamonds after diamonds! The only consolation I get out of seeing a deckie setting lines on fire is the knowledge that some of my new Gunpekies will be properly christened!

A decent sized fish with a Gun on a medium light boat bass MojorCraft Skyroad rod!

Candy coloured Gunpekis were firing too!

Occasional slowdown prompted the trial of lumos. This one goes to a Shout!

Oddly, candy colour Gunpekies was out firing other colours!

Sweet toothed diamond trevallies? Never heard of em? This candy coloured Gunpeki will show you otherwise.
The intense action lasted only for the first half of the day racking up about 10 jewels while the tally adds up to around mid 20s by day's end as the deckie out fished all 5 others combined as we enviously looks on with absolute disbelief!

It was a fun day out all in all and we'll surely be back for some revenge. Here are some of the actions caught on video for the trip, enjoy!


Full catch report can be found here. Photo courtesy of TackleSource.

Thursday 24 April 2014

Mr. Rusty visits Shimano Speedmaster

The final installment of Mr. Rusty and Dr. Hide. A Shimano Speedmaster with complains of rusty screw on the gearbox side. A thorough check and general service was also on the cards here.

Mr. Rusty didn't even bother hiding this time, openly showing where it left nasty surprises.
This reel feels perfectly fine and smooth and doesn't feel like it needs much done. But a strip down would be good to go through wear and tear or signs of damages. Upon opening up of the gearbox, there's water everywhere due to rinsing after use. No signs of rust, which is good.
Water droplets everywhere in the gearbox (red arrow). All surfaces cleaned and then brushed with marine grease to displace water. Ensure that no grease gets into the anti-reverse bearing.
With water droplets found everywhere, it's only safe to assume that the entire drag stack is also soaked and needs cleaning.


Drag stack and main gear looks well used with gunk but nothing out of the ordinary. Just a clean up and new grease application.

Externally, all parts look ok with the exception of a rusty screw. Brushed clean and smack a good dose of grease over it after screwing it back in would suffice. The anti-reverse bearing also seem to be working fine after it's early rust detection and rebuilt from a couple of months back.
Nothing out of the ordinary. Rebuilt one-way bearing's great, speedy RPCustom hybrid ceramic bearings is just as speedy.


Gearbox cleaning and new layer of marine grease applied without complications or damaged parts found.
External mechanical parts on this reel only needs a bit of cleaning and new packing of marine grease to keep it working wonderfully without binding.

Stripped down, cleaned and newly brushed on layer of grease helps displace water.

After everything's put together as it should be, a good wad of grease is packed into the rusty screw for some serious protection.
This concludes the trilogy mis-adventures of Mr. Rusty. I'm sure we'll have more incidents related to Mr. Rusty in time to come as it is close to impossible to entirely eliminate rust due to the nature of the hobby especially off shore fishing.

Friday 18 April 2014

Daiwa goes Ballistic noisy!


This noisy Daiwa wants a second life and a rebuild will be necessary to return it back to its Ballistically smooth ways. Owner of this reel wants to see if the 'grinding' noise can be eliminated so that he can happily hand it down to his son for a second wave of fish battles.

Daiwa Ballistic, made mostly out of carbon composite material, very light reel.

External inspection didn't reveal much but the grinding noise was very pronounced coming from the rotor or spool. Even when the spool's removed, the noise is still there. Noise was gone only when the rotor was removed. A different grinding feeling was evident when cranking without the rotor, which I'll come back to that in a bit.

This reel is made mostly out of carbon composite material in pursuit of lightness. What this also means is that it flexes when loaded heavily. A firm grip on the rotor on one hand and the other on the body will reveal a little bit of flexing when squeezed. This instance, the rotor flexes quite a bit and therefore rubbing against the reel body, hence the 'noise'. There isn't much to be done about this but to put up with it while fishing.

The different grinding feeling without the rotor indicates that either the gears worn off or some of the bearings are dirty. A strip down would soon reveal what's causing the grinding feel.

Spool seat, teflon shims, lower spool support bearing's in excellent condition. Drag stack is clean and wet, upper spool bearing support is fine too. Oscillating gear and bearing works wonderfully tool.
Most of the internal parts seem to be in excellent working condition without any signs of bashing or wear and tear. The only thing that isn't ideal is the mixture of oil and grease all over the gear box. Anti-reverse bearing was over flowing with oil oozing out when dismantled.

Main gear still has grease on most important bits, no excessive wear found. Pinion gear seems fine but the one-way bearing is flooded with oil. Floating shaft shows a bit of wear but no damages.
The culprit was mostly dirty bearings as they refuse to spin freely or smoothly. The bearings didn't show any signs of rust and it's usually a very good indication for a successful rebuild.

Crank shaft bearing removed to reveal no lubrication inside, light or heavy, just a little rough. Bail arm mechanism's dirty as well, cleaning should be simple and no rocket science involved.
The remainder of the bearings also showed some damaged roughness and this calls for the ultra sonic cleaner. Bearings seals removed, gunk or grease brushed off before dunking them into the bath.

Naked bearings getting their bits shaken to remove stubborn dirt.

Damage free bearings were free spinning like never before. Gear box cleaned off old grease and oil, new marine grease coated. Main gear, pinion gear and floating shaft thoroughly brushed and contact cleaned ready for a new layer of marine grease.
Ultra sonic cleaning has revealed true conditions of the bearings involved. Good ones tend to spin freely and damaged ones will stop abruptly. As the video below shows, first bearing's in good condition while the second one's a little damaged.


This Daiwa Ballistic will continue to serve the owner and live out its second life very well with further TLC over time and perform fixes earlier on when discovered to be behaving oddly. A surprising find is that the external condition looks a lot more weathered than what's inside which I at first thought would be a gruesome find. Time for this Daiwa to take on its second life and go Ballistic fish fighting once again!

Thursday 10 April 2014

Mr. Rusty visits Daiwa Certate

Mr. Rusty strikes back! This reel knob was apparently acting wobbly weird and the line roller wasn't even spinning. The victim in this case is a pimped up Daiwa Certate and it's time for a strip search!
Mr. Rusty left something unpleasant on this reel. We'll soon find out what and where.
First thing that was taken apart was the pimped up handle and knob. No rocket science, just a cap and a screw in the way of revealing the unpleasant gift from Mr. Rusty.
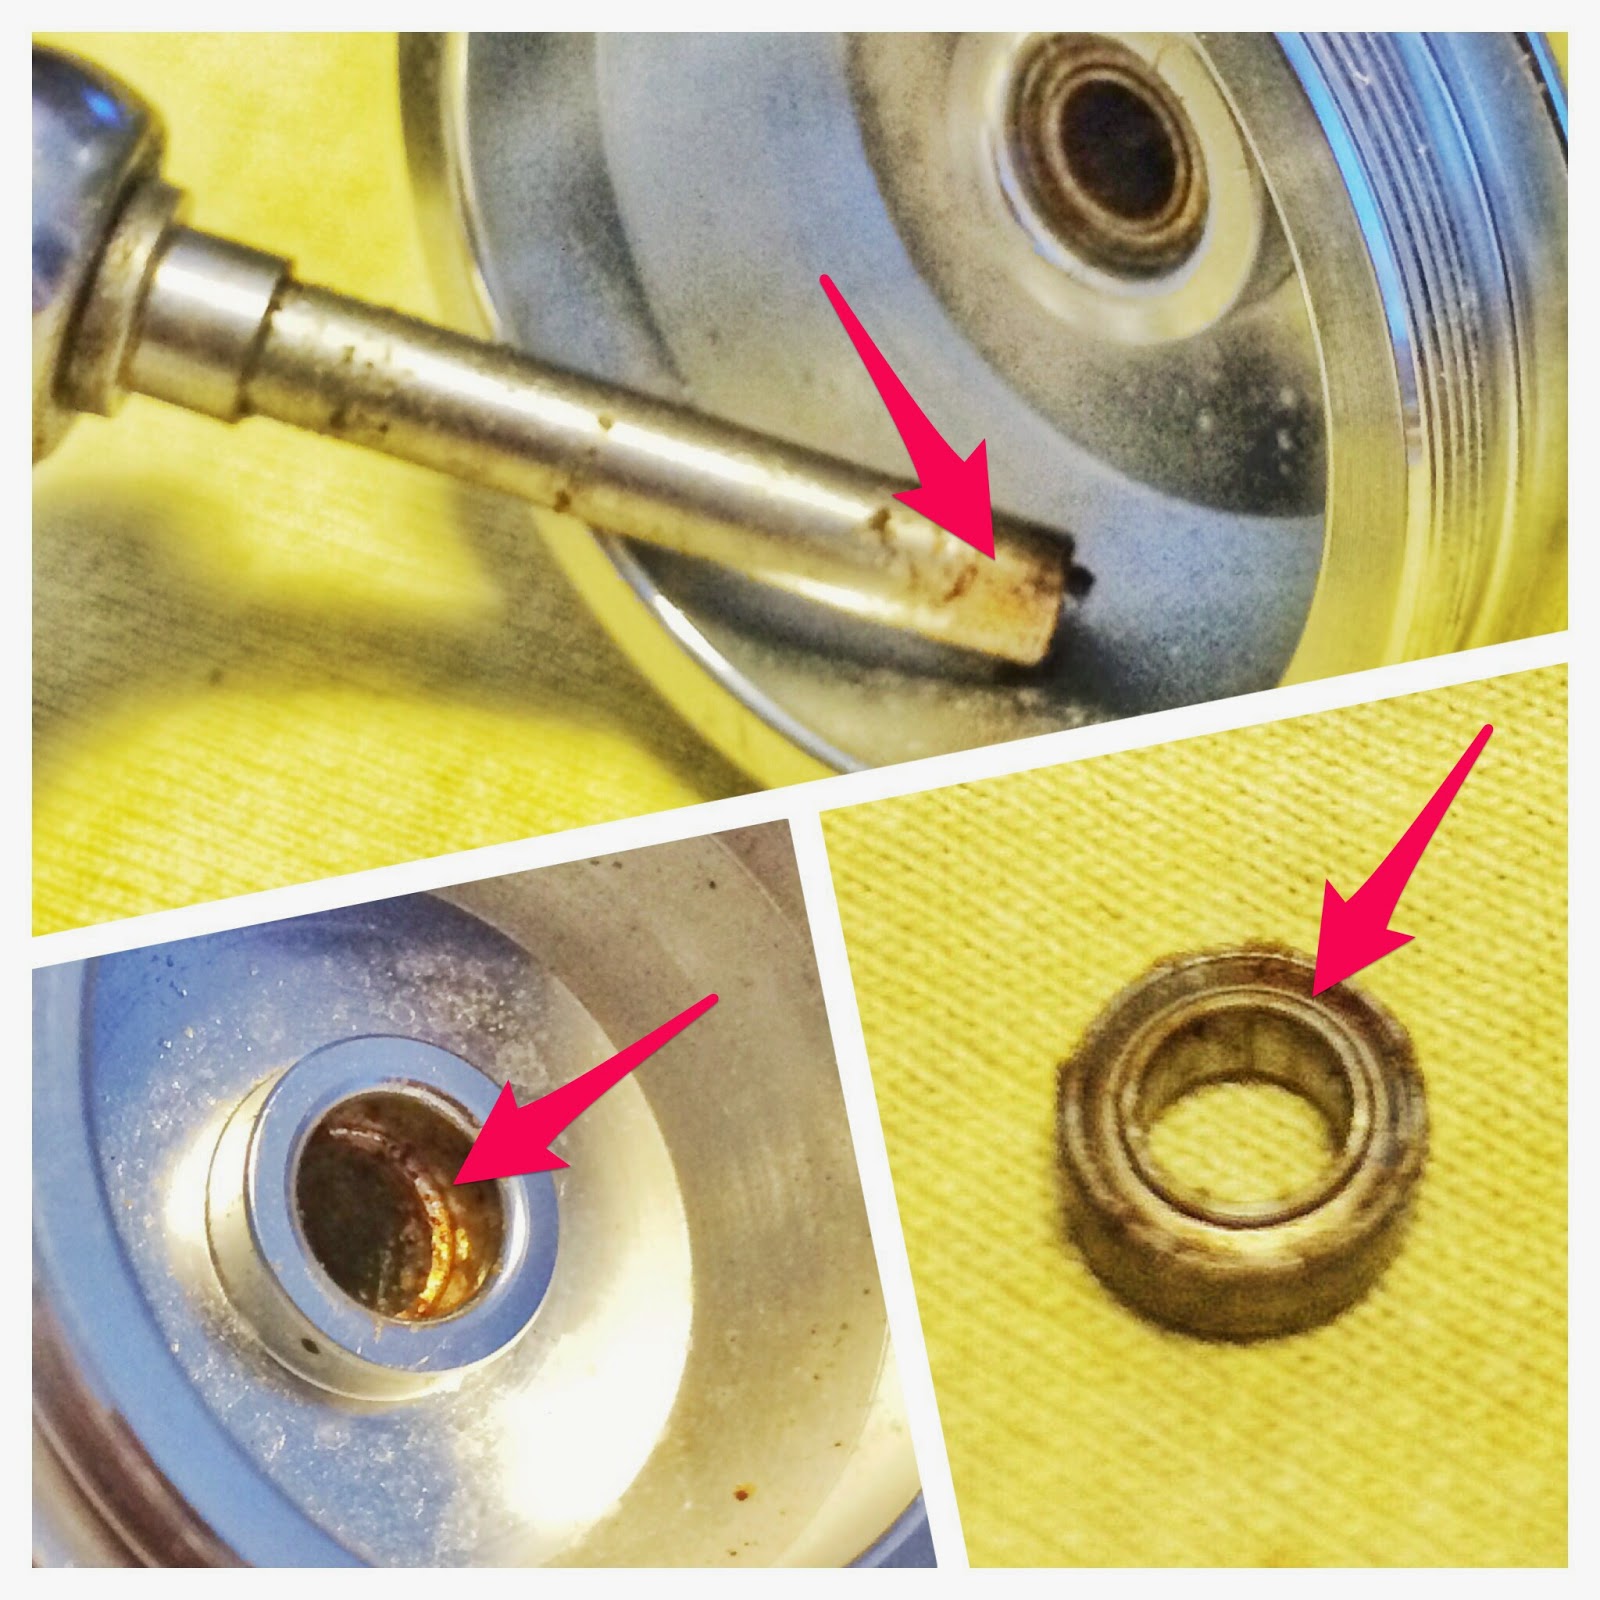
Knob slides off and behold! Mr. Rusty left an explosive dump here. Rust looked to have eaten up quite a bit out of the inner bearings most exposed to salt water, which is still stuck on the shaft as pictured. Bearing shield came off and that's a really bad case of rust and corrosion. The outer bearing seems perfectly fine.
The knob bearing closest to the handle seem to have exploded and grinded some of its own bits into the the potpourri of shield, balls, races to dust and rust.
It took quite a bit of time and rust remover to work deep into the corroded parts in order to dislodge the fused inner bearing race (blue arrow) on the shaft. Thoroughly chewed up shields (green) and busted balls (pink) only fell apart after rust remover seeped through the entire pile of rust over a period of time.

Mr. Rusty left some nasty scars of corroded pits on the shaft but isn't critical. All it needs now is a new bearing and proper coating of marine grease packed into the entire assembly.

New bearings being loaded with marine grease before fitment back into the handle shaft. Existing outer bearing cleaned and greased too.

Next up, line laying roller refused to spin. Screw removal was a little difficult too, I suspect it's overly enthusiastic thread locker used here as the screw is usually made of marine grade stainless steel that can withstand salt water corrosion without breaking any sweat. The shaft's aluminum, pretty much corrosion resistant.
Thread locker (red arrow) was found everywhere in the line roller shaft, including the inside of the bearing (white and red powdered stuff). Really bad stuff to be found in bearings. There seem to have a bit of rust but mostly jammed up thread locker's preventing the bearings to spin freely. It's causing quite a bit of challenge to remove the entire assembly as it's as good as fused together with so much thread locker everywhere. Luckily, after cleaning, the bearing seem to work fine only with slight roughness.

Cleaning of the line roller assembly was a little tricky as you need to physically remove the solidified material between tight creases like screw threads and worse of all, inside the bearings. This calls for steel bristle brushing and also good amounts of contact cleaner to remove any oily residue so that new marine grease could be packed into the entire assembly.

The remainder of the reel service was child's play after the above fiasco. Just a quick cleaning and new application of marine grease is all it needs. The only thing to be careful would be to avoid messing up the magseal.
Floating shaft & spool seat sleeve looked well used, still plenty of grease, no damages found. Cleaned, greased and good to go.

Avoid the magseal and you'll be left with just the gear box to deal with. You don't even need to mess with the one-way bearing. That's if it's spinning smooth and stopping without play.


Gearbox looks good, dry and like new. Just a quick clean up, wear and tear check, and add a fresh coat of marine grease. Nothing out of the ordinary and it's good to go.
The crack shaft bearing on the handle side seems a bit rough and a simple 2 step clean up with new grease packed in would do just fine. A 2 step clean up usually involves degreasing & contact cleaning after in order to replace lubrication in the bearing. Tougher grime or gunk would need the 3rd step involving an ultrasonic cleaning bath for a thorough cleaning.
No rust, but some light dust or gunk might have snugged in. Out goes the dirty grease and in goes new marine grease.

What have we learned today?

1. Go easy on the thread locker. What I usually do is use a small 'precision screw driver' to dip into the thread locker bottle/nozzle and then dab it over a few spots on screws. I don't even coat the entire screw. If too much was accidentally applied, just clean it off with paper towel before it dries. It doesn't even need to be reapplied upon next removal or the next, it stays there long enough to hold the screw from coming off. I only see a need for reapplication when there is absolutely no friction when removing the screw.
Steel brushed existing screw to strip off old thread locker gunk (white arrow). Light dabs of new thread locker and rub it around just a little towards the tip (red arrow).


2. Mr. Rusty can cause explosive damages to bearings if left unattended for too long. Early detection is key to stopping Mr. Rusty leaving unwanted gifts for your reel. Or you'll have an excuse to pimp it up with exotic parts.

Thursday 3 April 2014

How do you get a Biomaster to lay nice?


After a recent off shore trip to Pekan hauling some decently sized diamond trevallys, a friend noticed that his Shimano Biomaster was starting to make noise under load. A quick visual and external inspection revealed that the line laying guide wasn't spinning. No surprises there as this is first part to usually fail when offshore fishing often with lots of salt water exposure.

This Biomaster isn't the salt water variant and to my knowledge recent Shimano's don't come in salt water variant below 4000 sized reels.
Externally, this reel's already pimped up with an after market knob. The knob also felt like there was slight binding when spinning.

After market knob with an open outer cap allows water to easily splash into the bearings. When removed, the culprit was easy to spot with gunk and rust everywhere on the shaft as well as the bearing housing. Luckily, they are mostly light surface damages. Bearings stuck as I suspect rust has caught up inside.
Surface rust and gunk on this was easy to remove but the bearing was a bit more damaged. The bearing was free again after ultra sonic cleaning was done. Possibly only minor damages and seem to be quite smooth after being packed with marine grease. Not a major deal breaker nor will it generate noise therefore a replacement isn't necessary.

Once cleaned and rebuilt, bearing was working fine, light scuff found on shaft and bearing housing. A good dose of grease pumped in to the bearing, a wad to cover the screw and seams around the bearing for better protection as water can easily flow into this area.
The line roller set doesn't look so good upon disassembly. There was some force binding damages on the bail end cap and the bearing wasn't spinning as a result of rusty balls.
Forced binding damage found on the bail end cap (top left red arrow). Rust and gunk seeped into the like guide ring (green). Light rust was found inside the bearing where it's jammed up (bottom red arrows).
With a jammed up bearing, the only way to rebuild this is to clean it ultrasonically and see if it's ok for a rebuild. The rebuild was ok after the ultrasonic bath but not 100%. This means that the bearing is good to go fishing but grinding sound may not be entirely eliminated. A quick check with the owner says that he doesn't mind trying it out first to see if he can live with it.

This reel doesn't come with seals around the line roller and therefore packing the entire assembly with marine grease would greatly help in preventing water from entering. When you have no gaps or space inside the assembly, water will have no space to fill or trapped in
I prefer to replace any space/air in the line laying assembly so that water doesn't have any space to fill. This will serve as a very good seal against water intrusion at the same time lubricating the bearings for long periods of time. On top of that, line roller bearing's function is to take heavy torque load as priority, not speed, the likes of spool support bearings for bait-casters.
Fully loaded, marine grease oozing out (left) as the line guide is being assembled back into position. Replace space/air (right) with more grease to form a seal. Any excess can be brushed off afterwards.
Upon opening up the gearbox for a regular check-up and service, the sight was a bit shocking with corroded pits seen all over the main gear. Some of the gearing tooth were also affected with slight pitting.

Box was clean but needs a nice protective layer. Corroded pits can be seen everywhere (red arrows).
Some of the pits were on the gear tooth and some of the tooth were also showing signs of good use and worn off bits.

Some deep pits, cannot be removed (red). Well worn gears most likely from heavy cranking while fighting fish (blue).
There isn't much to be done with pitting but to give it a nice steel brush down to remove damaged bits off the surface and give it a new coat of protective marine grease.

Pits are still visible but a good layer of marine grease should keep it going for a long time to come. Nicely greased up box too.
This reel has put up some serious fight against quite a bit of fish as you can see from the collected gunk of fiber and grease on the drag stack.

Move along, nothing to see here with standard drags and nicely used gunk. Don't need messing about if it ain't faulty.

All in all, this reel has seen some serious action but needs a bit more TLC than its current condition. When I first picked up the reel, there were salt crystals everywhere on the reel. A note to the owner would be to at least give it a nice fresh water rinse down after off shore action and the reel will serve him long time.